Introduction
Push notifications are alerts that are "pushed" to a user's device by apps, even when those apps aren't open. In the case of web push notifications, the web app receives messages pushed to it from a server at any time. This includes when the application is active or inactive or not open in the browser and when the browser is inactive. Firebase Cloud Messaging is a cross-platform messaging solution that lets you reliably send these messages at no cost.
In this tutorial, we are going to be walking through how to set up Firebase Cloud Messaging to receive web push notifications in your React.js app.
Firebase Setup
Create an account at https://firebase.google.com, if you don't already have one. Upon successful account creation, you would be navigated to https://console.firebase.google.com afterwards, where you can create a project by clicking on the Create a project button and filling out the necessary fields.

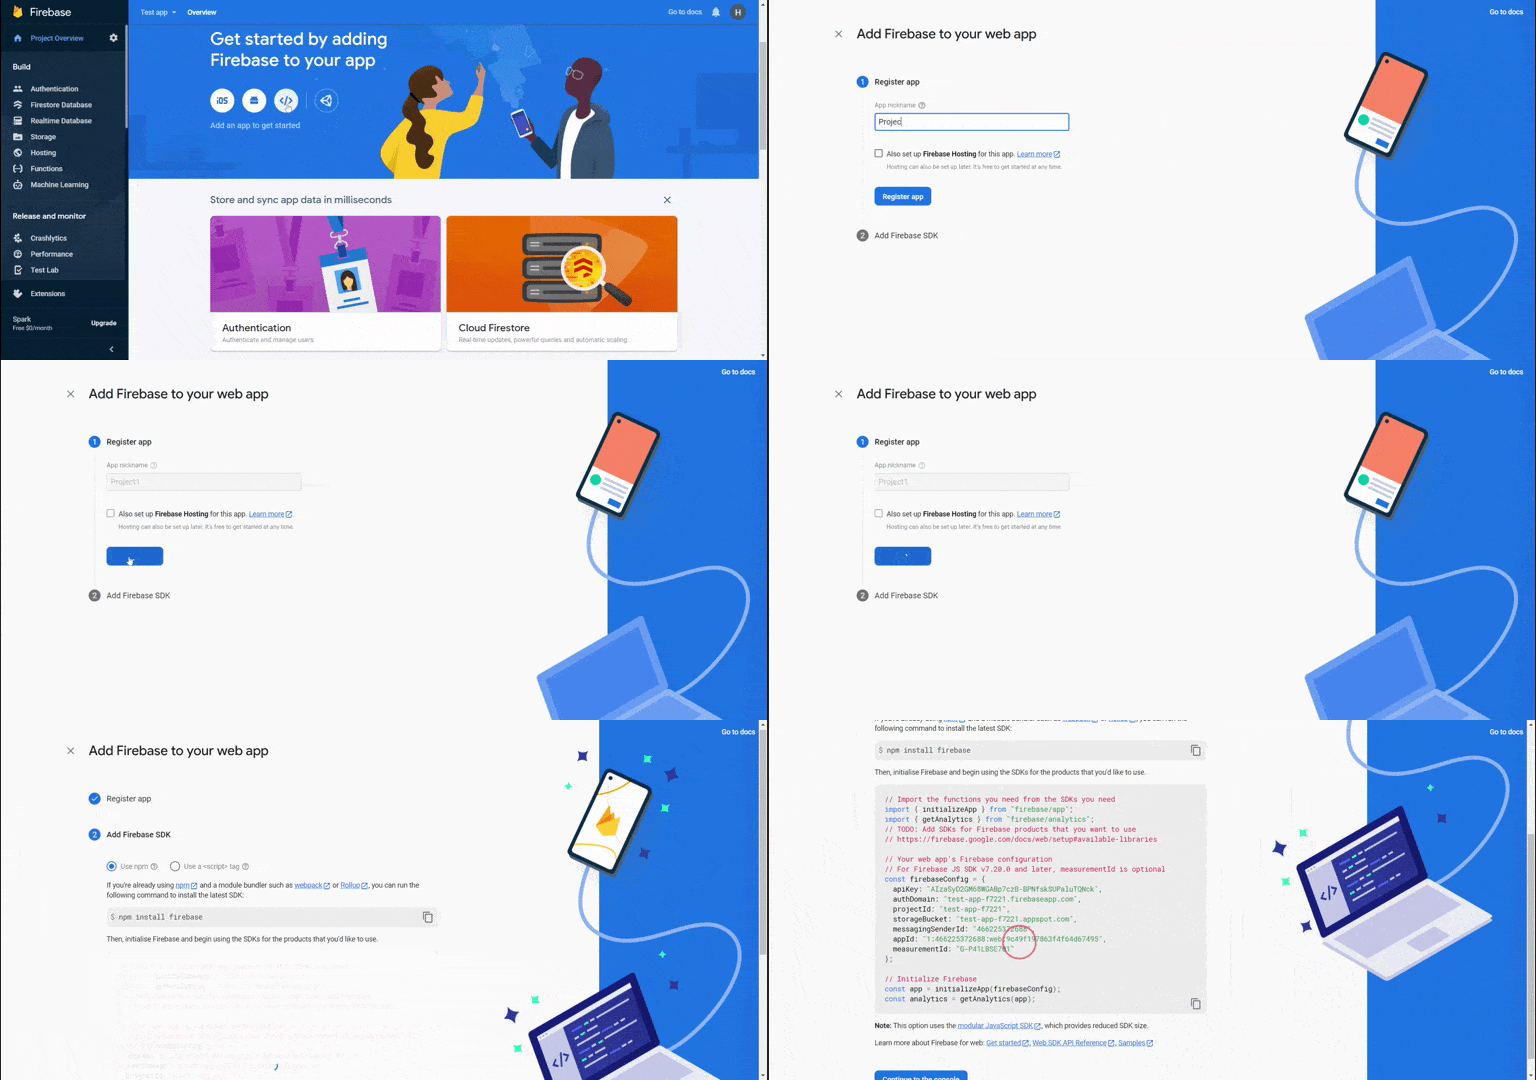
Once project creation is done. Click on the created project and select the platform you want to connect the service to. Since we are working on a web project we can select the web option by clicking on the (</>) icon. This would take us to an interface to Add Firebase to your web app. After filling in the field for app nickname and clicking the Register app button, it should generate a configuration object that we'll need to pass to our React app in later steps.


Connecting Firebase Cloud Messaging to our Application
- Install Firebase in your React project by running:
npm install firebase2. Create a new file called firebase.js and add the following lines of code :
import { initializeApp } from 'firebase/app';

// Replace this firebaseConfig object with the congurations for the project you created on your firebase console.
var firebaseConfig = {
 //...
};

initializeApp(firebaseConfig);
3. Import Firebase's messaging module into the firebase.js file:
import { getMessaging } from "firebase/messaging";

//...

const messaging = getMessaging();
4. Create a function called requestForToken that makes use of Firebase's getToken method. This lets you subscribe your app to push notifications. If notification permission has not been granted, this method will ask the user for notification permissions. Otherwise, it returns a token or rejects the promise due to an error.
//....
import { getMessaging, getToken} from 'firebase/messaging';

//....

export const requestForToken = () => {
  return getToken(messaging, { vapidKey: REPLACE_WITH_YOUR_VAPID_KEY })
    .then((currentToken) => {
      if (currentToken) {
        console.log('current token for client: ', currentToken);
        // Perform any other neccessary action with the token
      } else {
        // Show permission request UI
        console.log('No registration token available. Request permission to generate one.');
      }
    })
    .catch((err) => {
      console.log('An error occurred while retrieving token. ', err);
    });
};
Note: The getToken method requires you to pass a Voluntary Application Server Identification or VAPID key. You can get it by following these steps:
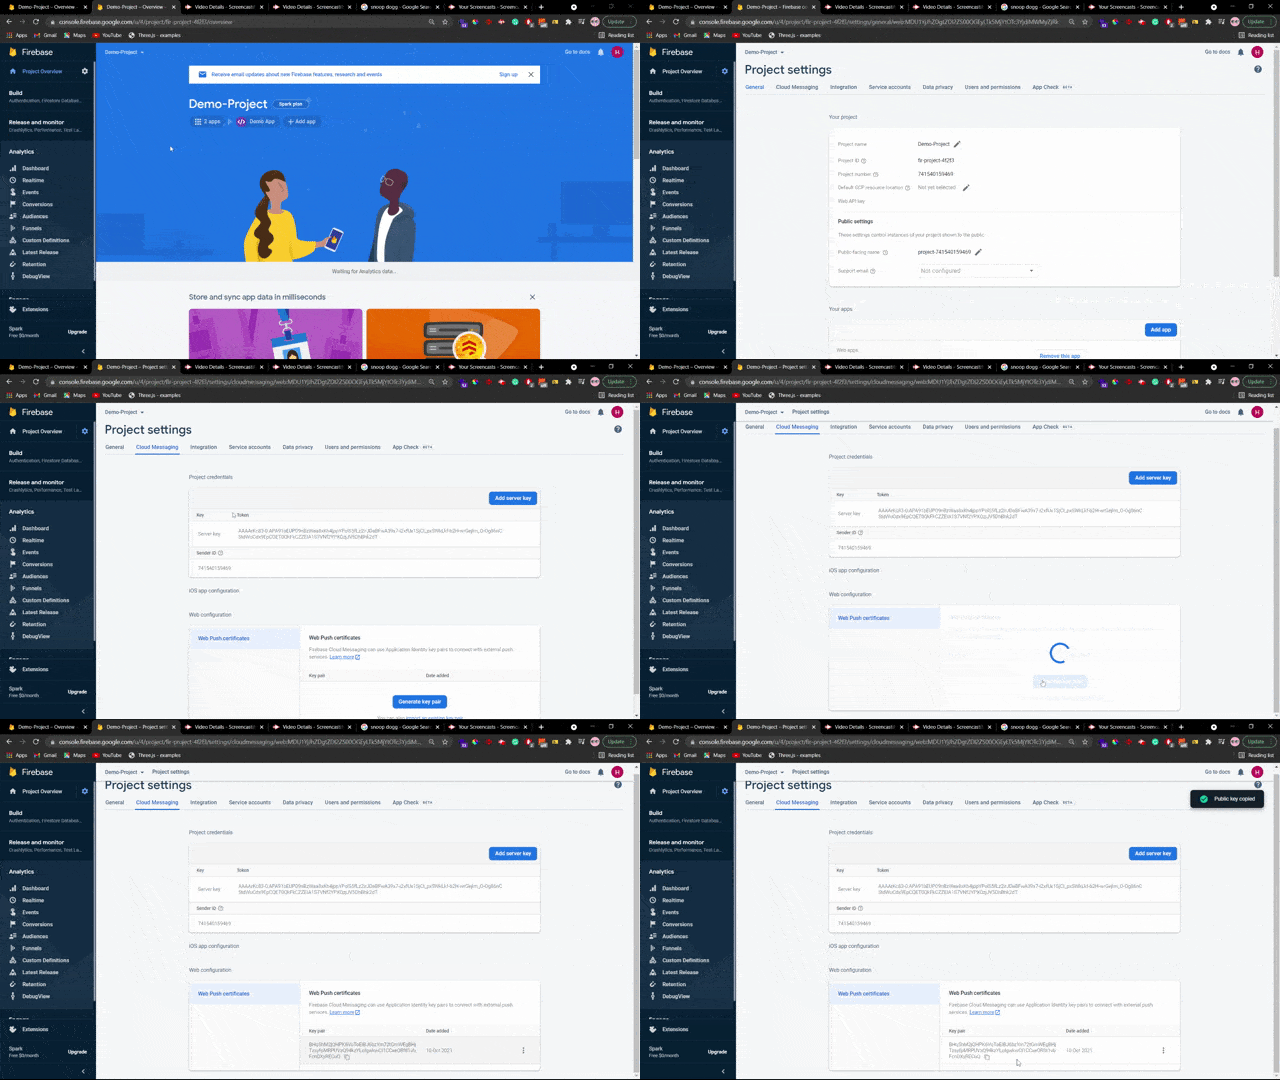
- Click on Project Settings for your project from the Firebase console, then navigate to the Cloud Messaging tab and scroll to the Web configuration section.
- Under Web Push certificates tab, click on Generate key pair.

5. Finally, you can link the firebase.js file to the rest of your project by importing it where it's needed. In this case, we can create a Notification component:
import React from 'react';
import { requestForToken } from './firebase';

const Notification = () => {
 requestForToken();
 //....
}
Additional Step:
The messaging service requires a firebase-messaging-sw.js file to work fine. We'll explain more about this file in the Background Listener Setup section of this guide. For now, create an empty file named firebase-messaging-sw.js in the public folder of your project.
Navigate to the browser console of your app to test if our app can connect to Firebase Cloud Messaging service. You should see the token that was received, if successful.

Something went wrong?
1.) If you got an error concerning permissions not being granted but blocked instead, you should make sure you set notifications permissions to Allow in your browser.

2.) If you got an error concerning a missing required authentication credential, then you probably passed the wrong VAPID_KEY.

Receiving Messages
Now that the initial setup is done, you'll need to configure message listeners. Foreground message listeners are called when the page has focus(i.e. when the user is on the browser tab containing our web app), while background message listeners are called when the user is on a different tab or even when the tab containing our app is closed.
Foreground Listener Setup
To handle messages when the app is in the foreground, you can make use of Firebase's onMessage method in your firebase.js file:
import { getMessaging, getToken, onMessage } from 'firebase/messaging';

//......

const messaging = getMessaging();
//......

export const onMessageListener = () =>
  new Promise((resolve) => {
    onMessage(messaging, (payload) => {
      console.log("payload", payload)
      resolve(payload);
    });
  });
You can then call the method in the Notification component. For this tutorial, I'm making use of react-hot-toast library to create a toast UI for displaying the notification details received from the message listener.
import React, {useState, useEffect} from 'react'
import toast, { Toaster } from 'react-hot-toast';
import { requestForToken, onMessageListener } from './firebase';

const Notification = () => {
  const [notification, setNotification] = useState({title: '', body: ''});
  const notify = () =>  toast(<ToastDisplay/>);
  function ToastDisplay() {
    return (
      <div>
        <p><b>{notification?.title}</b></p>
        <p>{notification?.body}</p>
      </div>
    );
  };

  useEffect(() => {
    if (notification?.title ){
     notify()
    }
  }, [notification])

  requestForToken();

  onMessageListener()
    .then((payload) => {
      setNotification({title: payload?.notification?.title, body: payload?.notification?.body});
    })
    .catch((err) => console.log('failed: ', err));

  return (
     <Toaster/>
  )
}

export default Notification
Background Listener Setup
To handle background messages, you'd need to make use of a service worker. A service worker is a script that your browser runs in the background, separate from the web page, enabling features that do not require a web page or user interaction.
You can go ahead to add the following lines of code to your firebase-messaging-sw.js file :
// Scripts for firebase and firebase messaging
importScripts('https://www.gstatic.com/firebasejs/8.2.0/firebase-app.js');
importScripts('https://www.gstatic.com/firebasejs/8.2.0/firebase-messaging.js');

// Initialize the Firebase app in the service worker by passing the generated config
const firebaseConfig = {
  apiKey: `REPLACE_WITH_YOUR_FIREBASE_MESSAGING_API_KEY`,
  authDomain: `REPLACE_WITH_YOUR_FIREBASE_MESSAGING_AUTH_DOMAIN`,
  projectId: `REPLACE_WITH_YOUR_FIREBASE_MESSAGING_PROJECT_ID`,
  storageBucket: `REPLACE_WITH_YOUR_FIREBASE_MESSAGING_STORAGE_BUCKET`,
  messagingSenderId: `REPLACE_WITH_YOUR_FIREBASE_MESSAGING_SENDER_ID`,
  appId: `REPLACE_WITH_YOUR_FIREBASE_MESSAGING_APP_ID`,
  measurementId: `REPLACE_WITH_YOUR_FIREBASE_MESSAGING_MEASUREMENT_ID`,
};

firebase.initializeApp(firebaseConfig);

// Retrieve firebase messaging
const messaging = firebase.messaging();

messaging.onBackgroundMessage(function(payload) {
  console.log('Received background message ', payload);
 // Customize notification here
  const notificationTitle = payload.notification.title;
  const notificationOptions = {
    body: payload.notification.body,
  };

  self.registration.showNotification(notificationTitle,
    notificationOptions);
});
Testing Notifications
To test whether the notifications are functional, you can trigger a test notification from the firebase console with the following steps:
- On your project dashboard, scroll to the Cloud Messaging section.
- Under the Notifications tab, click on the New notification button
- Fill in the information for Notification title and Notification text
- Under the Device preview section, click on Send test message
- In the popup that opens, enter the client token that is logged in the console as the FCM registration token and press the + button
- Make sure that the FCM token is checked and click on Test. You could also decide to fill in the entire Compose notification section and press the Review button at the bottom of the page to have it sent to multiple target apps.
If you're on the browser tab with the app opened, you should see a notification pop up.

While if the browser tab with the application isn't in focus, you should see a default system notification pop-up.

Note: To see a notification banner when notifications are received in the background, make sure to turn on the feature for your browser under your system's notification settings.

Something went wrong ?
There may be cases where a user doesn't get notifications immediately or at all. This can be due to a variety of reasons, some of which are covered here.
Repository Code
You can find the GitHub repo for this tutorial at https://github.com/AudreyHal/React-Firebase-Cloud-Messaging-Demo